Trekking in the Himalayas has been a dream of mine for a while now, and I figured I came all this way, why not go for the big one – Everest (locally, “Sagarmatha”). The Everest trekking region (on the Nepal side) is called Khumbu. For this post I’ll share the itinerary we followed, approximate costs along the way, random tips, and some photos that honestly just don’t do justice to how beautiful this trek was!
One of the big concerns I had (and this seems to be a common one among young people) – cost. But if you’re willing to carry your own load, and rely on a map and your own good judgement, base camp doesn’t have to break the bank. My plan coming to Kathmandu was to find trekking buddies on the website trekkingpartners.com, and I had been in conversation with a few people on similar schedules and budgets when a friend Sarah, who I’d met Rishikesh at yoga school, messaged me asking if I was still planning on EBC, and if I’d like to buddy up.
We spent a couple days in Kathmandu running errands – buying snacks, warm clothes (we both had mostly hot India weather attire!), renting sleeping bags and down jackets, booking flights to Lukla. And then we were off!
Itinerary:
Day 1:
-flight from Kathmandu, 4,593 ft./1,399 m., to Lukla to begin trek
-flight time: about 35 minutes
-start: Lukla, 9,300 ft./2,840 m.
-end: Phakding, 8,562 ft./2,610 m.
-trek time: 3-4 hours
-trek distance: 6.91 mi./11 km*
After both of us were up late into the night packing the night before, we were up at 5am and leaving for the airport at 6. My backpack weighed in at a little over 14 kg (30 lbs.); unfortunately I had all of my snacks out of the bag when it was weighed, which were easily another 7 pounds at least. We flew to Lukla and began trekking around 11am. By noon the rain had started, and we got poured on! We had most of our rain gear, but neither of us had a reliable backpack rain cover, and I discovered midway through our hike that I’d somehow forgotten to pack my rain jacket! We stopped for tea in Thado Koshigaon to try to wait out the rain, but unfortunately it just got heavier! We finally decided to brave it, and arrived in Phakding completely soaked.
Aside from the rain, the hike today was pretty easy, with much of it being downhill.
Day 2:
-start: Phakding, 8,562 ft./2,610 m.
-end: Namche, 11,300 ft./3,440 m.
-trek time: 7 hours
-trek distance: 9.54 mi./15 km.
A much much harder day, but luckily no rain! The hike from Phakding to Monjo (where we stopped for lunch), was a lot of up and down. I was so glad I’d decided to buy trekking poles, as they really helped with the downhill parts especially. After lunch, the trek turned to a pretty relentless uphill climb. We gained over 800 meters today, with significant downhill sections. Needless to say we were hurting by the time we reached Namche!
There is a checkpoint right after Monjo where you officially enter Sagarmatha National Park and must pay another 3,390 rupees.
Day 3:
-acclimation day in Namche
Altitude sickness is a serious concern when trekking at such high attitudes, so we took every suggested precaution to help our bodies cope. Once you pass 10,000 ft./3,048 m. it’s recommended that you ascend no more than 1,000 ft./305 m. per day, and take an acclimation day for every 3,000 ft./915 m. gained. So we took a rest day in Namche, and also began taking Diamox, a medicine that helps prevent altitude sickness. Our timing was near perfect, as that afternoon after taking just the first dose, we both began to feel the dull headache associated with high altitude. Throughout the rest of the trek, I very rarely felt the symptoms of altitude sickness – a little upset stomach or a small headache here and there, but overall I’m convinced that taking Diamox made the acclimation process a lot less painful! It’s worth noting, though, that Diamox can cause a very unnerving tingling in the fingers!
We met fewer people than we expected without guides or porters. The most common response we got from people when we said we’re trekking solo – “you’re so adventurous!” (Judging by the tone, I think a lot of them were thinking “crazy!”)
Day 4:
-start: Namche, 11,300 ft./3,440 m.
-end: Tengboche, 12,700 ft./3,860 m.
-trek time: a little over 5 hours
-trek distance: 8.95 mi./14 km.
The hike out of Namche was about 30 minutes of steep stairs uphill, but the next 2-3 hours were a nice, mostly flat walk along a ridge line. Unfortunately there was a lot of fog today and we couldn’t see much of anything! After stopping for lunch in Phunke Tenga, we crossed a bridge and began our uphill climb. It took about 2.5 hours of constant, pretty steep uphill to reach Tangboche. The climb into Namche was hard, but in my opinion this was harder. It rained on us for only the last 15 minutes or so.
Today was the first day my legs and butt really started screaming at me with each step! And tonight was the first night I felt bone-chilled cold, unable to fall asleep, unable to really warm my toes.
The biggest Buddhist monastery in the Khumbu region is in Tengboche, Dawa Choling.
Day 5 (crossing above the tree line):
-start: Tengboche, 12,700 ft./3,860 m.
-end: Pheriche, 13,900 ft./4,240 m.
-trek time: almost 5 hours
-trek distance: 6.97 mi./11 km.
The trail became a lot less crowded today, and a lot less well marked. The trek from Tengboche to Pangboche (where we stopped for lunch) was fairly easy and relatively flat. The last “big” village you pass is Somare, and then the trail becomes pretty unclear. There is a fork that seems to go three ways, and we stayed to the far left, hiking up a pass that seemed too unmarked to be right. When we finally reached the top and saw Pheriche we were relieved. But when we got the bridge to cross into it, we saw a much clearer trail, the middle fork we assumed, that would have taken us around the side of the hill instead of over it. We made it, but were not the happiest with the mistake we’d made!
No rain today, but another day of pretty heavy fog and poor visibility/few views. We began trekking this morning with lush greenery and trees surrounding us, and ended it with a pretty barren setting; the only living plants this high were hearty, low-profile shrubs.
Day 6:
-acclimation day in Pheriche
We took a short hike today, and were lucky enough for clear (if very windy) conditions. Perfect for the amazing views of Kangtega, Thamserku, Ama Dablam, Island Peak, Nuptse, Lobuche, Cholatse, and Tawoche peaks.
Day 7:
-start: Pheriche, 13,900 ft./4,240 m.
-end: Dughla, 15,200 ft./4,620 m.
-trek time: 2 hours
-trek distance: 3.04 mi./5 km.
Today was one of the easier days. The trail started off flat, and you climb all 300 meters at once, and then cross a bridge into Dughla! The next couple days are short as well; while part of me wanted to keep going, it’s better to be safe and follow the 300 meters per day rule to avoid altitude sickness.

Day 8:
-start: Dughla, 15,200 ft./4,620 m.
-end: Lobuche, 16,100 ft./4,910 m.
-trek time: 2 hours
-trek distance: 2.47 mi./4 km.
We woke up to fresh snow on the ground! Although it was melting quickly, and very loudly as it poured off the roofs and onto the ground. The hike out of Dughla was pretty hard, probably an hour or so of straight uphill. Then we came to a small cemetery (I believe it’s only people who have died while attempting to summit Everest but I’m not sure). After that the trek became easier. It was another very foggy day, and there is more than one trail out of Dughla. Throughout the trek we noticed this – one main trail, and others that were usually less pronounced. They seemed to be “shortcuts” (but steeper and more rocky) that Sherpas take. Luckily this trail was very well marked with rock “ducks.”
Day 9:
-start: Lobuche, 16,100 ft./4,910 m.
-end: Gorakshep, 16,900 ft./5,140 m.
-trek time: 3 hours
-trek distance: 3.86 mi./6 km.
One of the side effects of very high altitude is trouble sleeping. I had been feeling this for the last few days, but it reached an all time high last night. I couldn’t fall asleep or stay asleep for long, and when I did my sleep was disturbed with vivid and unpleasant dreams. When the alarm went off at 5:30, I had been wide awake for over an hour.
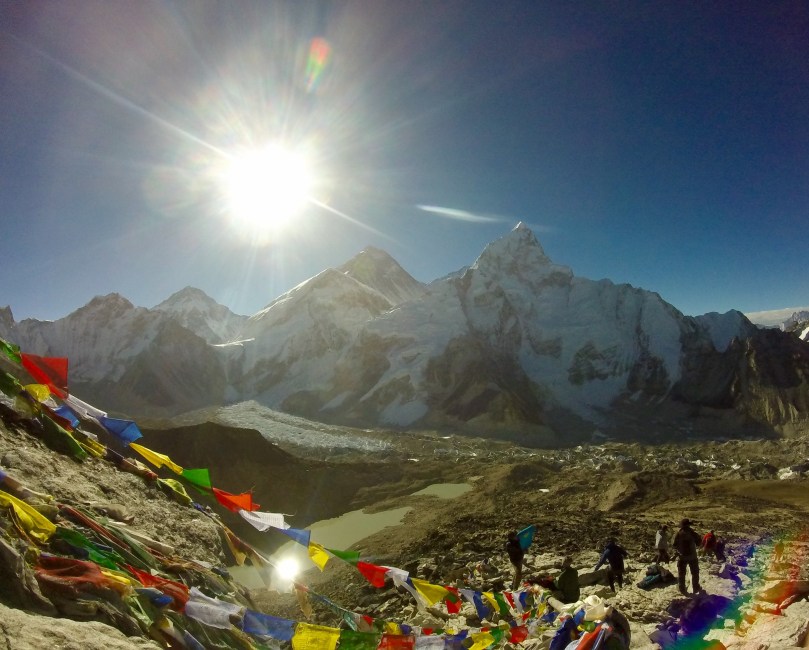
The trek today was beautiful. The first hour or so was pretty flat, with fresh, powdery snow all along the trail. Then about an hour uphill climb. For the last hour it’s a mix of up and down, up and down. After a particularly large hill, we looked to our right and saw Khumbu glacier! What an amazing sight! Shortly after arriving in Gorakshep it began to snow lightly outside. It was beautiful to watch, but this is exactly why we left so early every morning – so that we could enjoy the rain (and up this high, the snow) from inside!
Day 10 (the BIG day!):
-start/end: Gorakshep, 16,900 ft./5,140 m.
-trek to: Everest Base Camp, 17,600 ft./5,364 m.
-trek time: about 2 hours to B.C., and 1.5 hours back to Gorakshep
-trek distance (total): 5.67 mi./9 km.
The hike to base camp was much easier and shorter than expected. And of course it helped that for the first time, we were able to leave our heavy backpacks behind! After about an hour and a half of moderate ups and downs, we could already see base camp, with numerous groups of tents belonging to summit attempters. On the hike in we passed a few groups that by their matching jackets and wind-burned faces, we could tell had been climbers. One guy we met had made it to the top!
On our way into Base Camp, we saw two avalanches and heard another two! What a site! First the loud clap, like thunder. Then the immense sound a huge waterfall makes as it beats into the water below. And the mass of snow rushing down the mountain in a cloud. One of the highlights of the entire trek!
Base camp is beautifully nestled into Khumbu glacier, and with the sun beating down on it, icicles dripped and glacier rivers flowed. It was unlike anything I’ve ever seen. We walked to the end of the tents, about 30 minutes in, and stopped on a rock to admire the views and enjoy a snack. Once we stopped moving, it was freezing. And soon it began to snow! With the adrenaline and joy of making it to our destination, I didn’t even mind the cold or the snow; I think it made the experience even more spectacular!
Day 11 (the other BIG day):
-start: Gorakshep, 16,900 ft./5,140 m.
-trek to: Kala Patthar, 18,200 ft./5,550 m.
-end: Lobuche, 16,100 ft./4,910 m.
-trek time: Gorakshep to Kala Patthar 2 hours; Kala Patthar back to Gorakshep 1.5 hours; Gorakshep to Lobuche 2 hours
-trek distance (total): 7.55 mi./12 km.
I call this the other big day, because it was our first Everest sighting. Because of the cloudy, foggy days, we hadn’t been able to see Everest from the couple of viewpoints along the trail so far. In addition to being our first viewpoint, Kala Patthar is also the highest elevation we reached. And up that high, every 100 meters made such a huge difference. The hike, 2 hours straight uphill, was probably the hardest for me (even without the backpack!) Breathing was almost impossible, nausea and faintness the entire walk. But we made it! And we were so lucky to have a cloudless sky! From Kala Patthar you can see Everest as well as it’s neighbor Lhotse (the fourth highest in the world, although from this viewpoint it seems to surpass Everest). Trekkers who hiked to Kala Patthar in the days following were unfortunately not as lucky, as the weather was getting worse and worse.
We ate lunch in Gorakshep, packed our bags, and began our descent. The walk back to Lobuche took about 2 hours, and was pretty rocky, and lots of up down up down. But not very hard, and luckily pretty short after the very tough morning hike we had!
Day 12:
-start: Lobuche, 16,100 ft./4,910 m.
-end: Pangboche, 12,900 ft./3,930 m.
-trek time: 5.5 hours
-trek distance: 15.7 mi./25 km.
Since starting our trek, we had been talking about whether or not to go back to Lukla via Chola Pass and Gokyo Lake. It’s supposed to be beautiful, but also hard. The passes go over glaciers, and can be quite slippery. The map warns “crampons recommended” and “stay to the left, crevasse danger.” We were nervous about doing it without a guide, as we’d heard that the trail isn’t well marked in a lot of places. We were also nervous about doing without porters, for fear of slipping on ice with our huge backpacks. We had also heard from guides that it’s safe, but only when the weather is good. And at this point, it had snowed 3 of last 4 days. And we were also tired; my weak knees were getting weaker and weaker. Nonetheless, we wanted to try. So we left Lobuche with the intent of forking to the right to head toward Dzongla and the beginning of the Chola Pass trail. When we reached the fork, the wind was blowing, snow smacking into our faces. It was cold. We actually missed the fork because we couldn’t see very well. Weighing all of the pros and cons, we decided it wasn’t a good idea to head towards a harder trail, alone, at the end of the season (with fewer and fewer trekkers in the area), as monsoon season was just hitting its stride. So we went left, back the way we came. And the universe agreed with us – for about 15 minutes the sun came out, shining on us and left fork; the right fork still dark and covered in fog.
The hike back to Pangboche was a lot of downhill. And the snow never really let up, although it did turn to rain as we descended and the afternoon warmed everything up (even if just slightly).
Day 13:
-sick day in Pangboche
Sarah had unfortunately been feeling the effects of the altitude more than I was. Her stomach caused problems for much of the trek, and she was too weak and tired to trek today after an especially rough night. So we stayed in Pangboche.
Day 14:
-start: Pangboche, 12,900 ft./3,930 m.
-end: Namche, 11,300 ft./3,440 m.
-trek time: a little over 5.5 hours
-trek distance: 11.33 mi./18 km.
The trek from Pangboche to Namche was harder than expected. From Pangboche to Tengboche (where we stopped for lunch) was an uphill climb, and the rest was a constant uphill downhill uphill downhill, ending in the steep steps down into Namche.

Day 15:
-start: Namche, 11,300 ft./3,440 m.
-end: Lukla, 9,300 ft./2,840 m.
-trek time: 8 hours
-trek distance: 14.96 mi./24 km.
Today was probably the biggest surprise of the whole trek. All I remembered of the hike from Lukla to Phakding was the rain, and that it was easy. I knew Phakding to Lukla was going to be a lot of downhill at first, then the up down up down that is so hard. But I expected a relatively easy 6 or 7 hour day. I got a very very hard 8 hour day. In the pouring rain. But I was determined to get to Lukla. I was so eager I didn’t even stop for lunch (definitely a mistake in retrospect – never skip a meal!) And around 4:30, soaking wet and pretty miserable, I finally did. I finished the trek! Even after such a long hard day, that felt really good.
Day 16:
-tried (unsuccessfully) to get on a flight back to Kathmandu
Flying into and out of Lukla is notoriously hard. Flights are cancelled all the time if the weather isn’t perfect, and without a guide booking for you, it’s confusing to know for sure if you’re even confirmed for one of the planes that may or may not come. Because of bad weather, flights had been cancelled for 2 days before I arrived in Lukla, so though the skies were clear today, I watched Sita airlines planes come and go, with no seats available.
Day 17:
-flight back to Kathmandu!
I was lucky enough to get on the 2nd flight out of Lukla! Even though I was told to arrive at 7am, I arrived closer to 6:30, and I think being one of the first in line that day really helped in getting me a seat. The flight out was just as beautiful as the flight in, but the excitement I felt coming into Lukla was replaced with a sense of accomplishment, and also a little sadness that I was leaving this beautiful place. But what an experience! It was fun, hard, painful, rewarding, amazing.
The first two things I did as soon as I was back in Kathmandu? 1.) ate 3 bananas 2.) showered – I had zero of both for the last 2 weeks (I have to say bananas were much more missed!)

*the trekking distance here was recorded by the Health app on my iPhone, and I can’t guarantee that it was 100% accurate every day!
Costs:
-round-trip flight between Kathmandu and Lukla – $300
-trekking gear in Kathmandu – $175
-rented sleeping bag and down jacket – $1/day – $16
-average daily budget (food and accommodation) – $17/day – $270
-trekking and national park permits – $20 and $33 – $53
-total: about $800
-(the price we heard most frequently for hiring a guide locally was $20/day)
Miscellaneous tips:
-don’t buy used trekking poles in Kathmandu; I did, and saved a few bucks, but one broke halfway through the trek
-tea houses range from free to 200 rupees per night, but you’re expected to take all of your meals there and you’ll be charged if you don’t
-we trekked the last 2 weeks of May, the end of the season as monsoon was coming on; it was cool being there as summitters were coming down, and the trails were not very busy a lot of the time which was nice. I can’t imagine going in the colder months (although that’s apparently when you get the clearest skies), but it would have been ideal to come a few weeks earlier to avoid the rain and snow
Final Thought:
Everest Base Camp is rated as a “moderate” trek, and for most people in decent physical shape this is probably true. The asterisk here is the porter (or in our case, the lack of a porter and the 30+ pound backpack).
On the first day, about 30 minutes out of Lukla, we stopped to use the bathroom. Putting my heavy backpack back on, I somehow ended up crouched on the ground, struggling. An older Sherpa man came over and offered a pole to help me steady myself and stand up. After a pathetic effort, I gave up and took the backpack off. The man asked, “No guide? No porter?…Very difficult, very hard, very problem…”
While we made it, and were that much more proud for having done it alone, I’d adjust this trek to “difficult” for anyone brave enough to carry their own load. There were many, many times I wished I wasn’t. My face in this picture sums it up pretty well – I was really excited, but the struggle was real. Very problem indeed, wise old Sherpa, very problem indeed.


